
If you’ve been involved in the cryptocurrency space for any bit of time at all, you’ve likely heard from more experienced users that you should keep your crypto in “cold storage”. This means storing your coins via a wallet address / private key combination that was generated and exists in an offline environment.
The reason this is so important is because of the nature of the internet itself. The web was designed for information to flow from one place to another, not for areas to be blocked off or inaccessible.
Try as we might to create spaces on the internet that are hard to access like login-protected bank accounts and cryptocurrency exchanges, the reality is that these platforms are always at risk of being hacked. No data is 100% safe when stored online.
This is where cold storage comes into play. By storing your coins offline you are eliminating one of the largest attack vectors that someone could use to steal your cryptocurrency.
Of course, there are trade-offs when making this security decision. The most apparent is convenience. There are methods to generate and store cryptocurrency keys offline like paper wallets or random generation methods like dice, but they aren’t exactly “easy” to do. Paper wallets need a trustworthy generator and dice are time consuming.
Furthermore, these methods are fragile. If you lose your copy of the private key? Tough luck. There goes your cryptocurrency forever.
Luckily, there is more advanced method that allows you the convenience of a traditional cryptocurrency wallet with the security of cold storage: The hardware wallet.
One of the first hardware wallets to be developed was the Trezor. Created in 2014 by the SatoshiLabs company, the Trezor brought cold storage to the masses in a manner which was “secure, easy to recover and easy to use”.
This reputation continues to this day. Trezors are highly recommended by many cryptocurrency enthusiasts, have been named a top blockchain gift idea, and are considered an excellent choice for anyone interested in a convenient cold storage method. There are two models available for purchase, the traditional Trezor One (SatoshiLab’s original product) and the Trezor Model T (a high-end alternative).
If you’re interested in learning more, this blog will walk you through the following topics:
How Does a Trezor Work?
We’ve discussed the importance of cold storage, but you may still be asking how you can know that Trezors are sufficiently acceptable as a cold storage method. At the end of the day….you are buying this product from a centralized company, right? How are you supposed to know that the device wasn’t tampered with before being sold? And how can you be certain that it won’t be hacked while in use? Let’s cover the reasons below:
Secure Recovery Seed / Private Key Production
At the very heart of how a Trezor works is the production of the private keys and recovery seed for the public cryptocurrency addresses that the hardware wallet will be used for. If you don’t know what these terms mean, we recommend the quick video below:
This private key / public address combination is the most important UX feature of cryptocurrency. As the video mentions, if someone has access to your private key, they can take complete control over any funds within your public addresses.
With this in mind, it is essential for a functional wallet to have a secure method of generating a private key that can be accessed by you and you alone.
This is where the Trezor’s recovery seed function comes into play. From the official wiki:
During Trezor device initialization, the “Create a new wallet” process creates a new wallet with a new recovery seed. This recovery seed consists of a certain amount of English words (12, 18 or 24) from which the account private keys, all private keys, public keys, and addresses are mathematically derived. Creation of the recovery seed and master binary seed is as follows.
First, the 256-bit random number is generated in the Trezor device on its Microcontroller by the RNG (Random Number Generator). This number has 256 zeros or ones, so the entropy, or randomness, of this number is 2 ^ 256. This equals approximately 10 ^ 77. For comparison, it is estimated that there are 10 ^ 78 to 10 ^ 82 atoms in the known universe.
A random number of the same length is then generated in the connected computer and sent to the Trezor device. These two numbers are now together hashed by the SHA-256 algorithm – this number, which is again 256-bit, is the basis for the creation of the recovery seed, let’s call it initial entropy.
Trezor also supplies the helpful infographic below to illustrate the process:
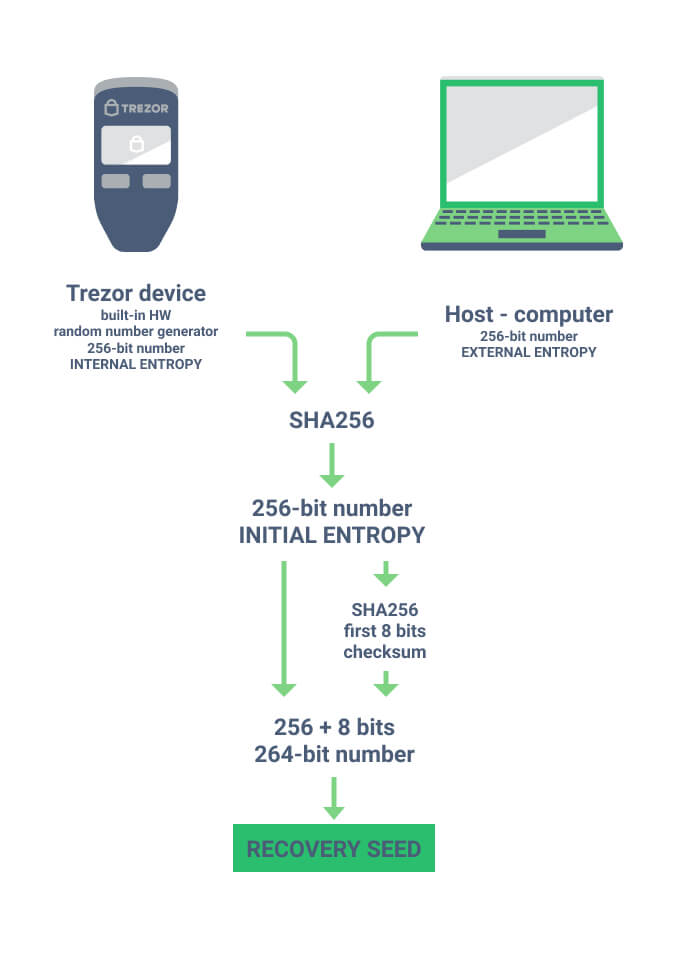
The TL;DR of the process is this:
- The Trezor device produces a provably random number
- Your computer produces a provably random number
- These two are combined to produce a new random number (which is provably unique by thanks to the mathematics of cryptography)
- This number is the basis of your cryptocurrency private keys and a seed phrase
After this process is completed, your Trezor is now capable of generating public addresses (to receive cryptocurrency) and using the private key to sign transactions and send cryptocurrency from those addresses. And, if you should lose the Trezor, your recovery phrase can be used to gain access to the funds via a new device.
Thanks to the software and hardware design of the Trezor, these functions can all happen without the private key ever leaving the device.
So how can you interact with cryptocurrency networks that are inherently online without your private key leaving the device? This is where the Trezor Wallet comes into play:
Trezor Wallet Integration
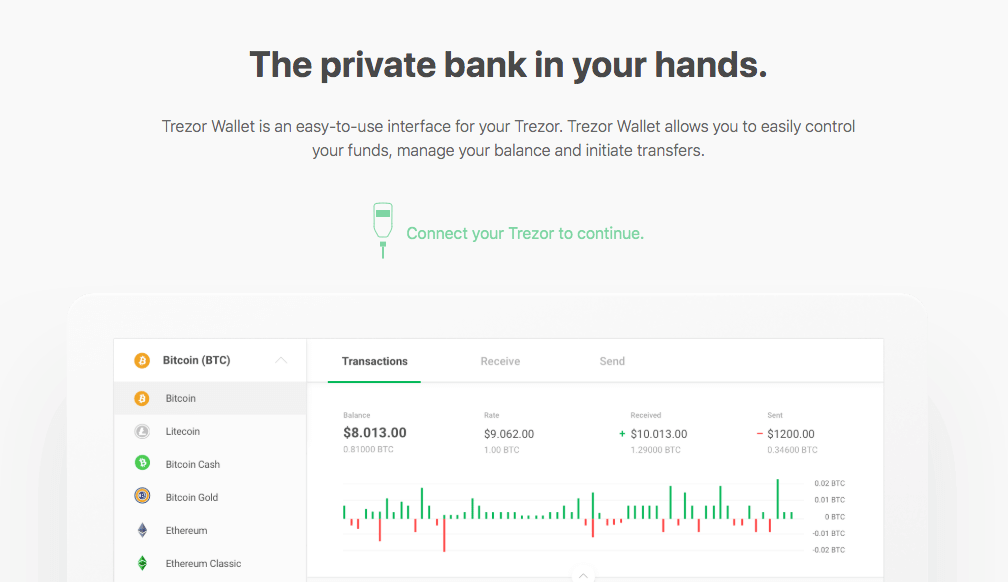
The Trezor Wallet is the client that is used to safely connect your secure hardware wallet with the outside world of cryptocurrency blockchains. It’s an easy-to-use interface that looks like this:
As you can see from the screenshot above, the Trezor wallet has all the functionality you would expect from a traditional crypto wallet (along with a few extra features like buying crypto via partner exchanges).
We’ll walk you through the full process of how to use the Trezor wallet further below, but for now the main point to understand is that this wallet never actually has access to your private key. The wallet is simply an interface that you use to communicate with the Trezor device itself.
Here’s the breakdown of how a Trezor transaction works:
- A Trezor is connected to a computer with the wallet client running
- The wallet client creates a transaction message
- That transaction message is sent to the connected Trezor
- The transaction is verified by user input on the Trezor device itself
- That signed transaction is sent back to the wallet
- The wallet broadcasts this signed transaction to the network
This process is fundamentally the same as the way that all cryptocurrency transactions are processed, it’s just that with a Trezor you are utilizing a separate piece of hardware to ensure that the private key is never exposed to the Internet.
For a visual breakdown of the transaction process and the cryptography behind it, we recommend watching this video from 1:08 – 1:54:
Now that you understand how the Trezor hardware, software, and wallet client interact, there’s one other aspect of the product you should be aware of:
Open Source Design
The final key element that makes a Trezor trustworthy as a cold storage device is the fact that all of the software and hardware functionality we just described is open source. From the official security wiki:
The software used in Trezor devices has always been open-source to be fully auditable. Everybody can look at the code used in Trezor devices and verify its integrity, look for vulnerabilities, or come up with improvements and integrations.
We made Trezor fully transparent to eliminate the inherent need for trust and to share as much of our knowledge and ideas with the broader community.
This open source philosophy is in-line with the spirit of cryptocurrency. It has always been a commonly-accepted principle that projects should be open source so that they can be verified by the community at-large. When you use a Trezor, you have the knowledge that the code has been vetted for security by actual users, not just a single company.
How to Use a Trezor One
Now that we’ve walked through the technology that makes these ingenious hardware wallets function, it’s time to dive into what it’s like to actually use a Trezor.
First up is the Trezor One. The next sections will be walking you through unboxing and making your first transactions on the device:
Unboxing a Trezor One
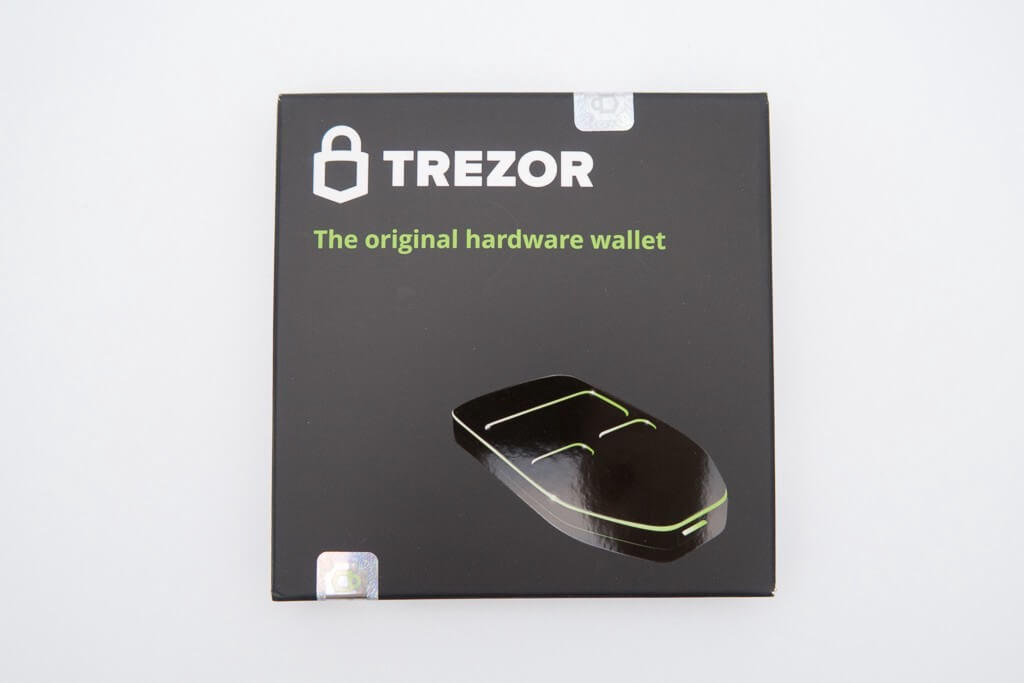
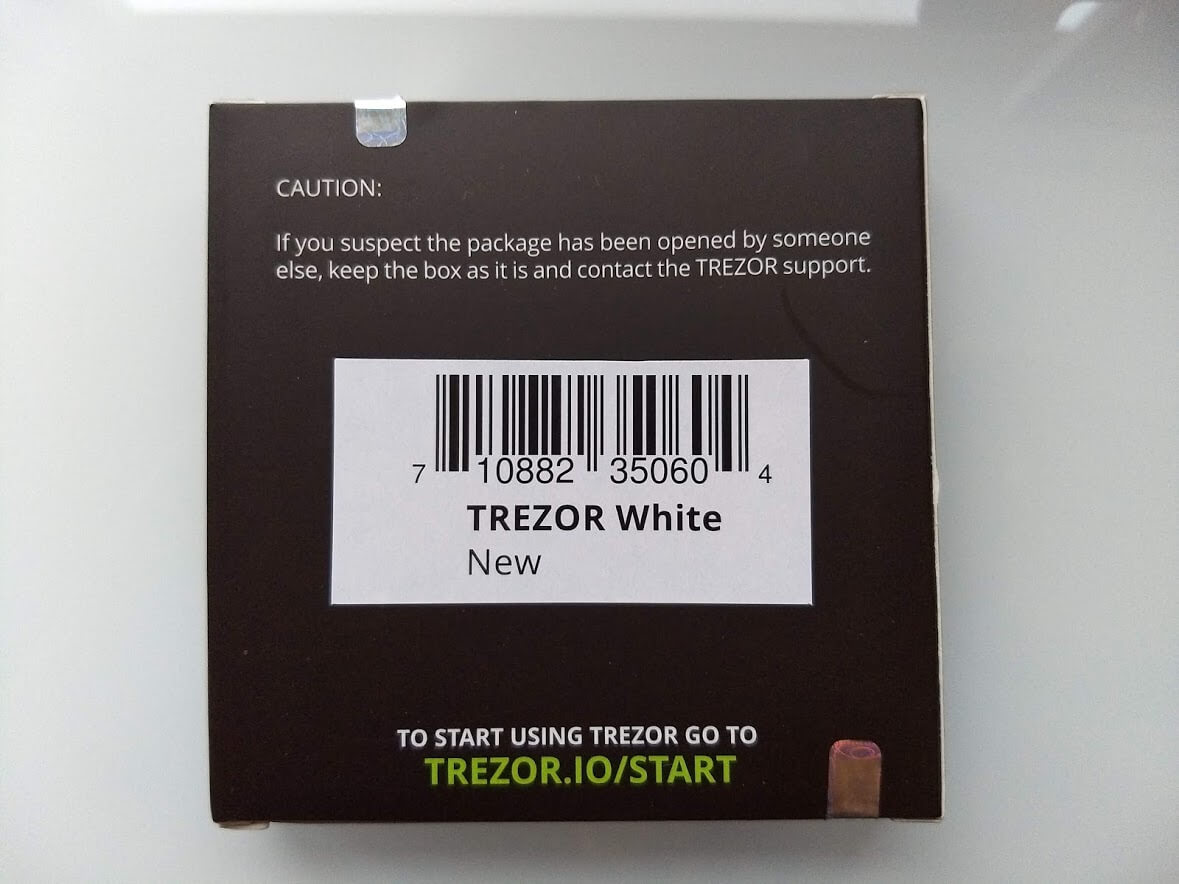
The Trezor comes in the nondescript black box seen below:
Once unboxed, you should have all the pieces below:
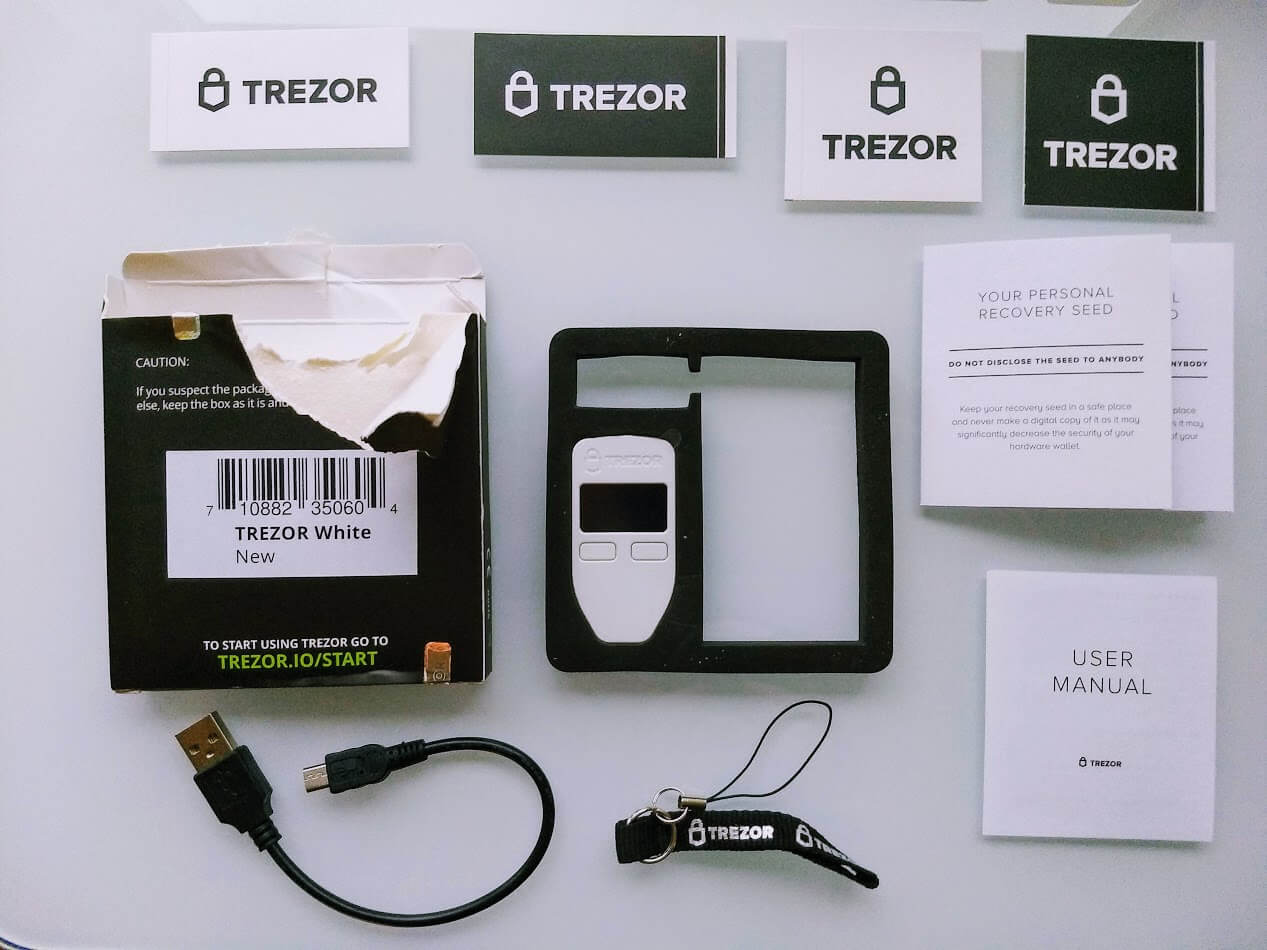
The package will contain:
- 1x Trezor Device
- 1x MicroUSB cable
- 2x Recovery seed card
- 1x Lanyard
- 4x Stickers
- 1x User manual
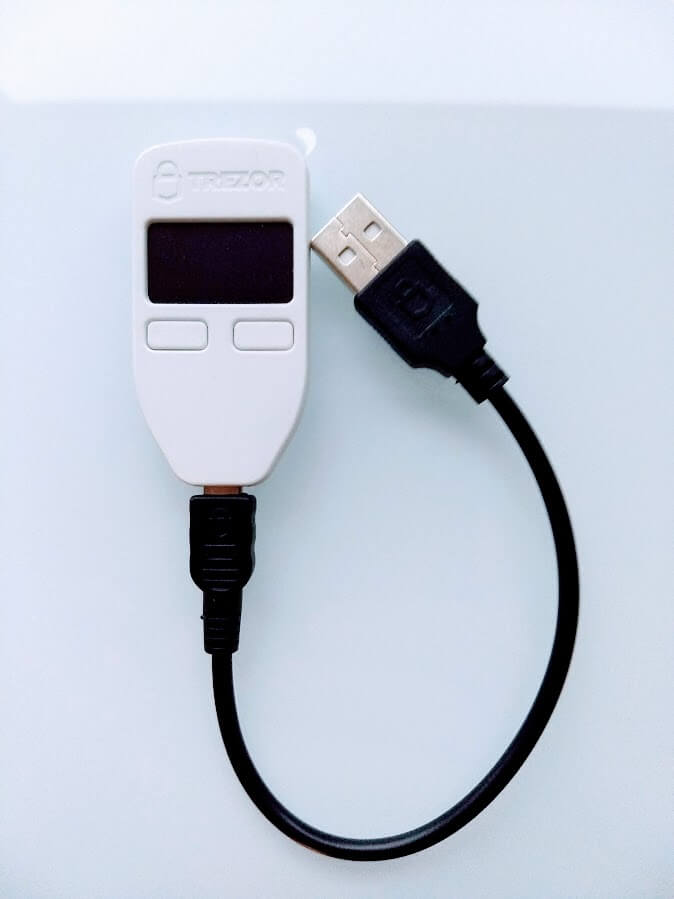
The star of the show:
Setting Up a Trezor One
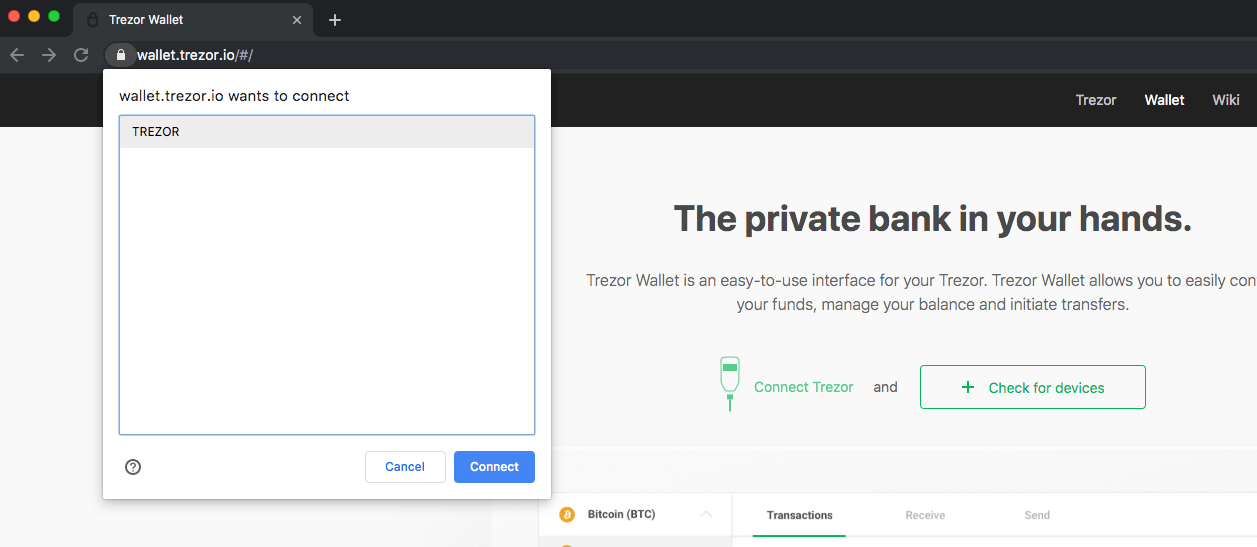
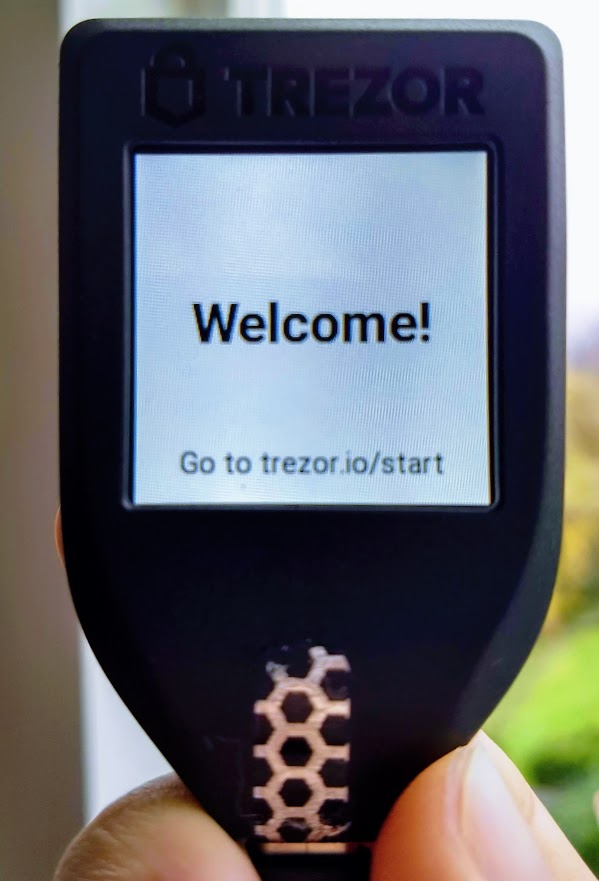
To begin the process you can follow the instructions on the box and navigate to Trezor.io/Start/. You’ll then be instructed to select the device you are using (in this case, a Trezor One), and confirm. From there you’ll be taken to the wallet homepage and asked to connect your device:
Connecting the device is as simple as using the provided micro USB cable to plug the Trezor into your computer. You may receive a pop-up message that identifies the device.
Note: If you’re having trouble connecting the device, you will likely want to install the Trezor bridge communication software. It’s not always required, but if for some reason your browser is not recognizing the device, it should ensure that the process works flawlessly.
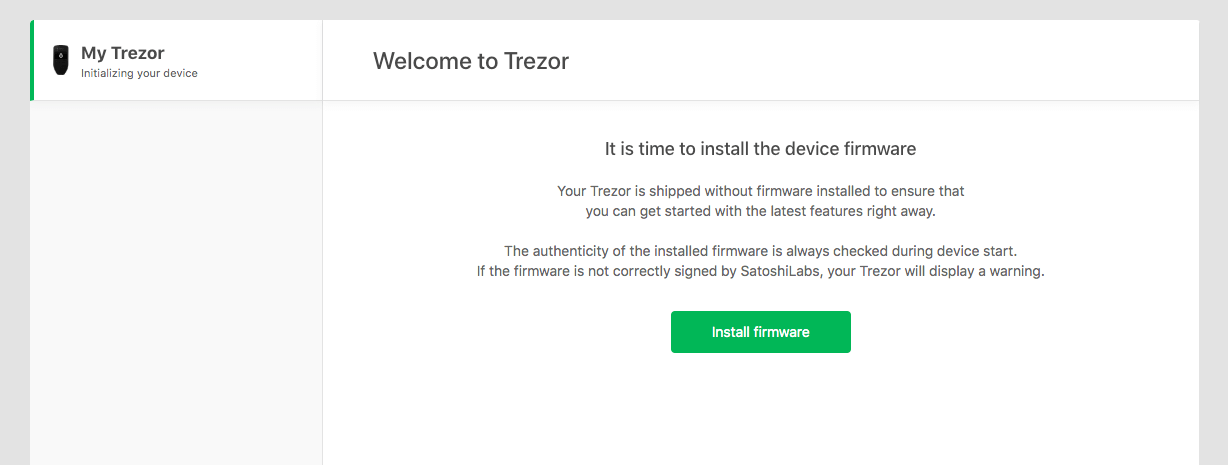
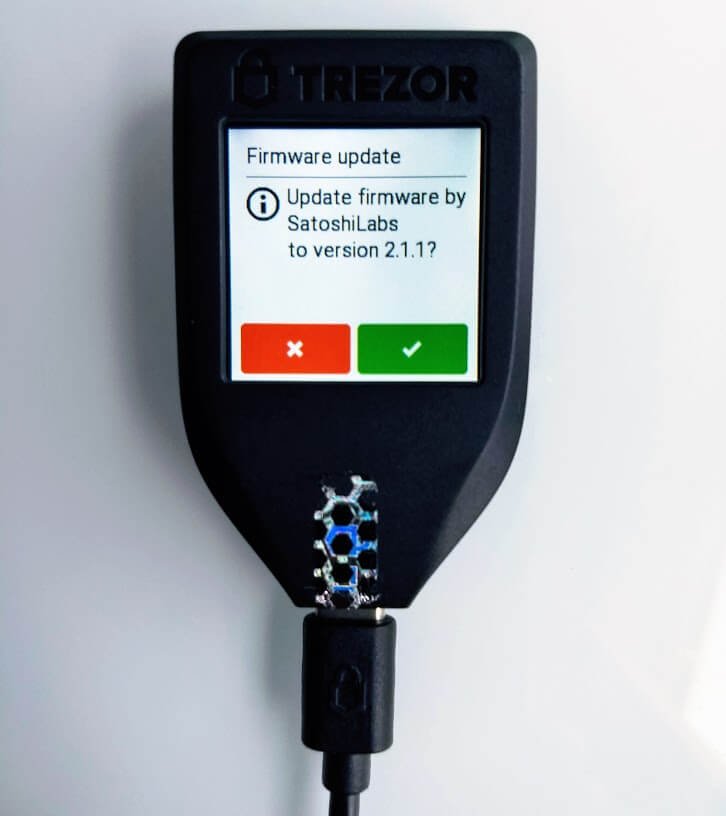
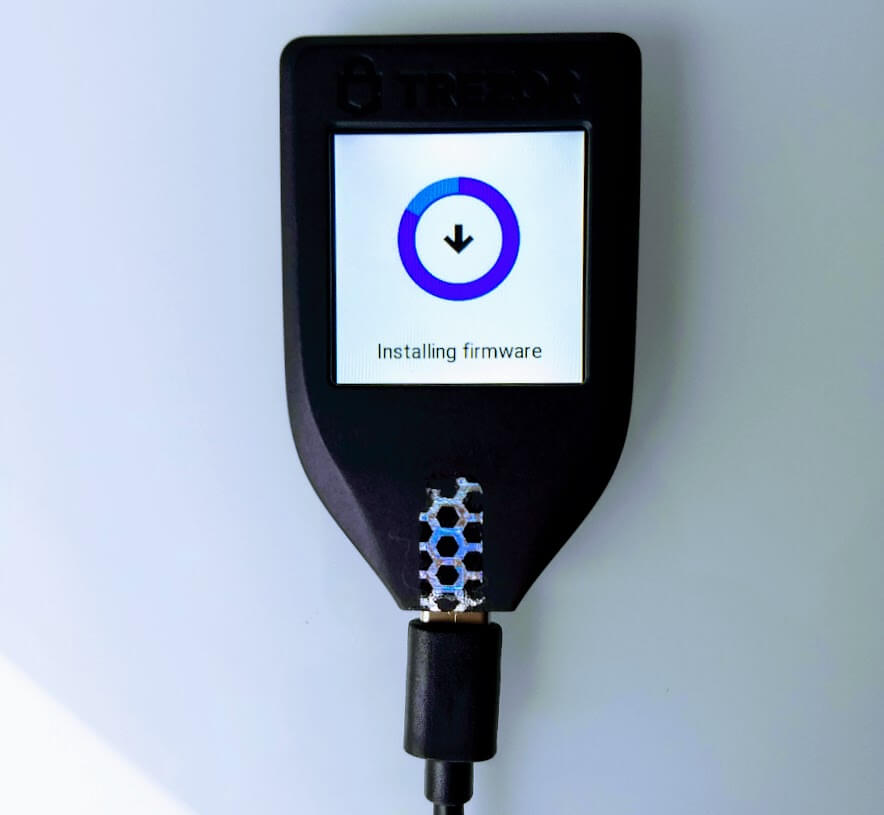
Once your Trezor is connected, you will see a screen prompting you to update the firmware. This is always recommended as the latest firmware will ensure that your device is as secure as possible.
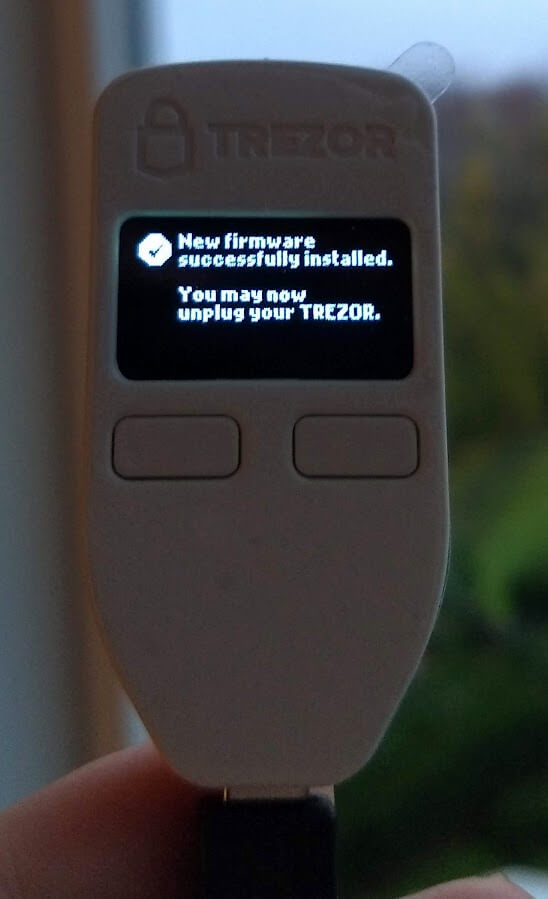
Note that the screen of Trezor itself will be displaying updates as you make your way through the setup process. Upon a successful firmware update, you’ll receive the following message:
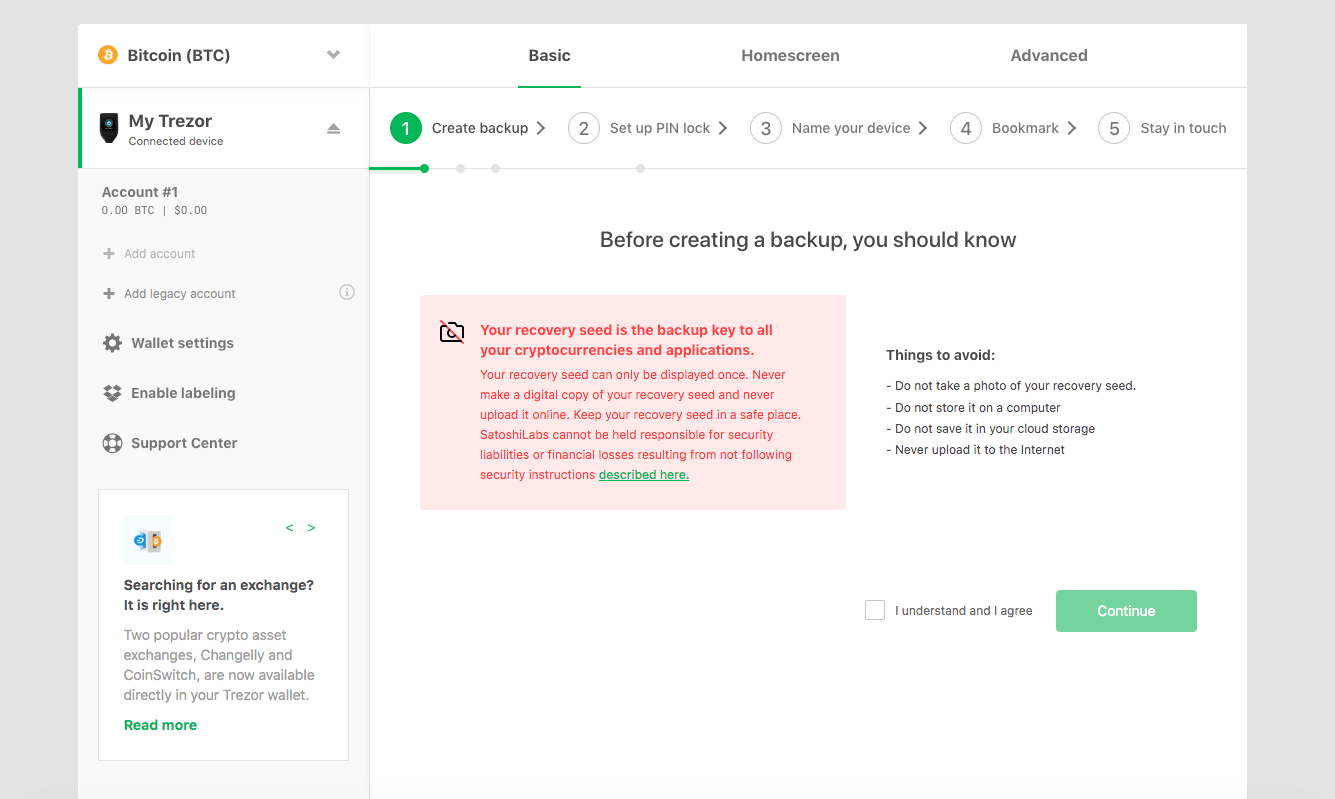
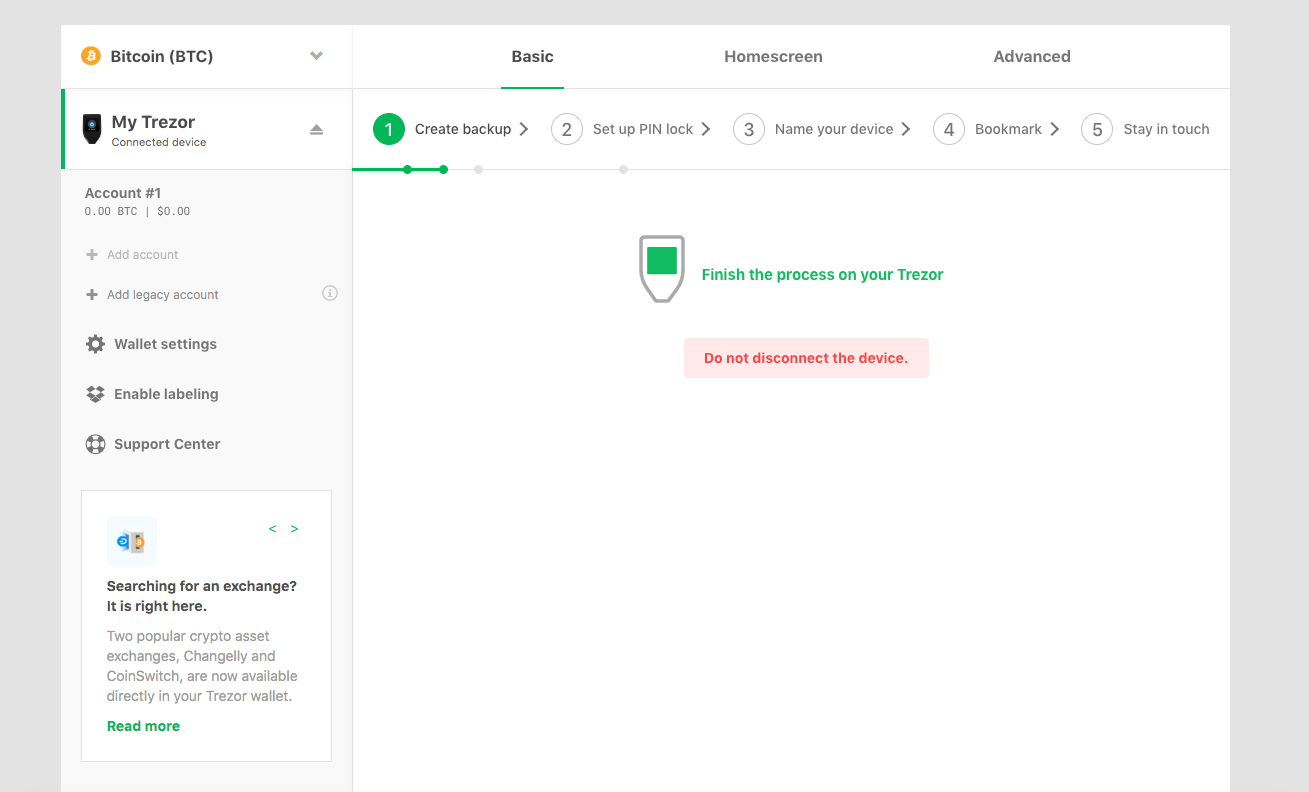
Following the firmware update you’ll be taken through a process that includes creating your backup (the recovery seed we mentioned earlier), setting up a PIN lock for the device, and naming the device. The first step is the backup process:
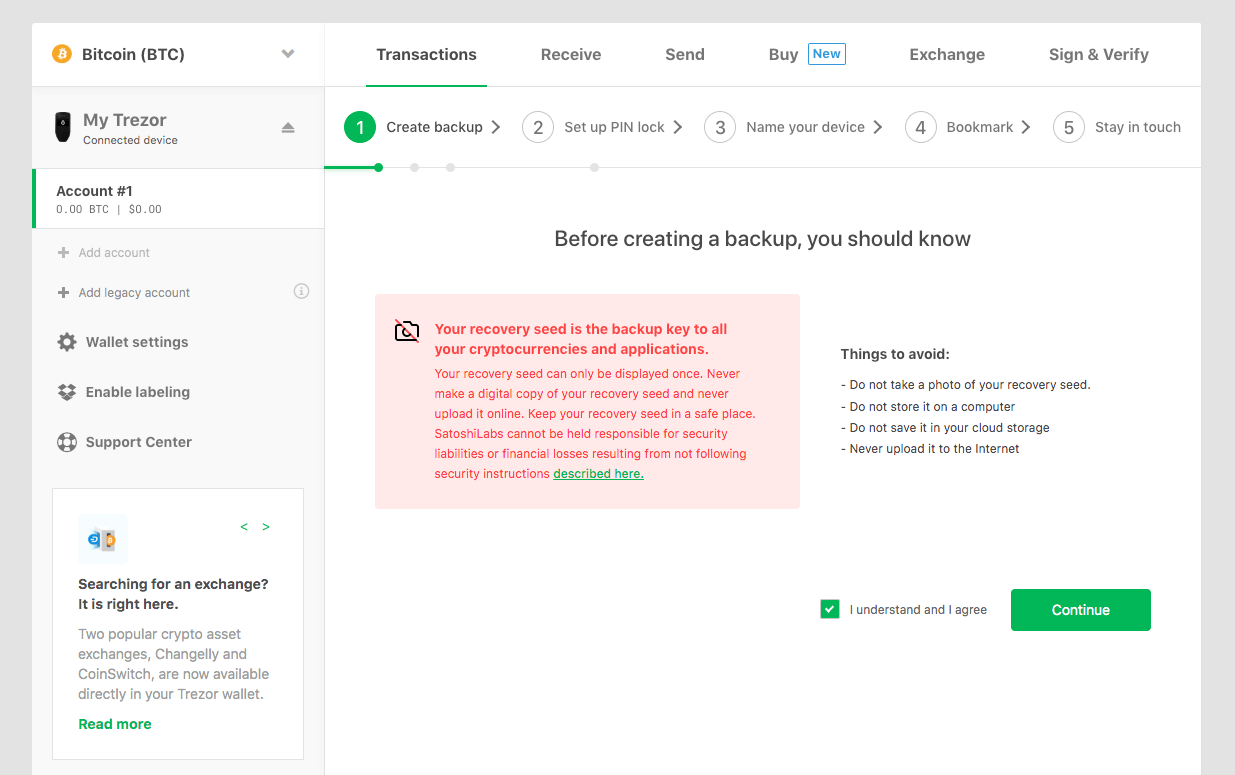
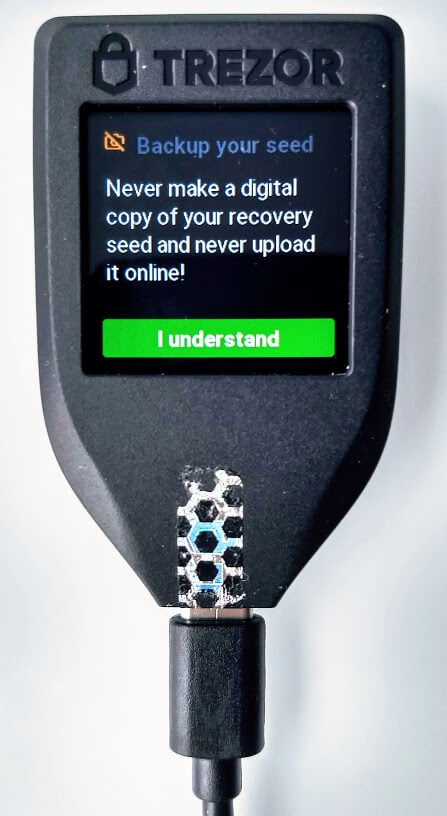
After confirming you’ll be ready to write down your seed:
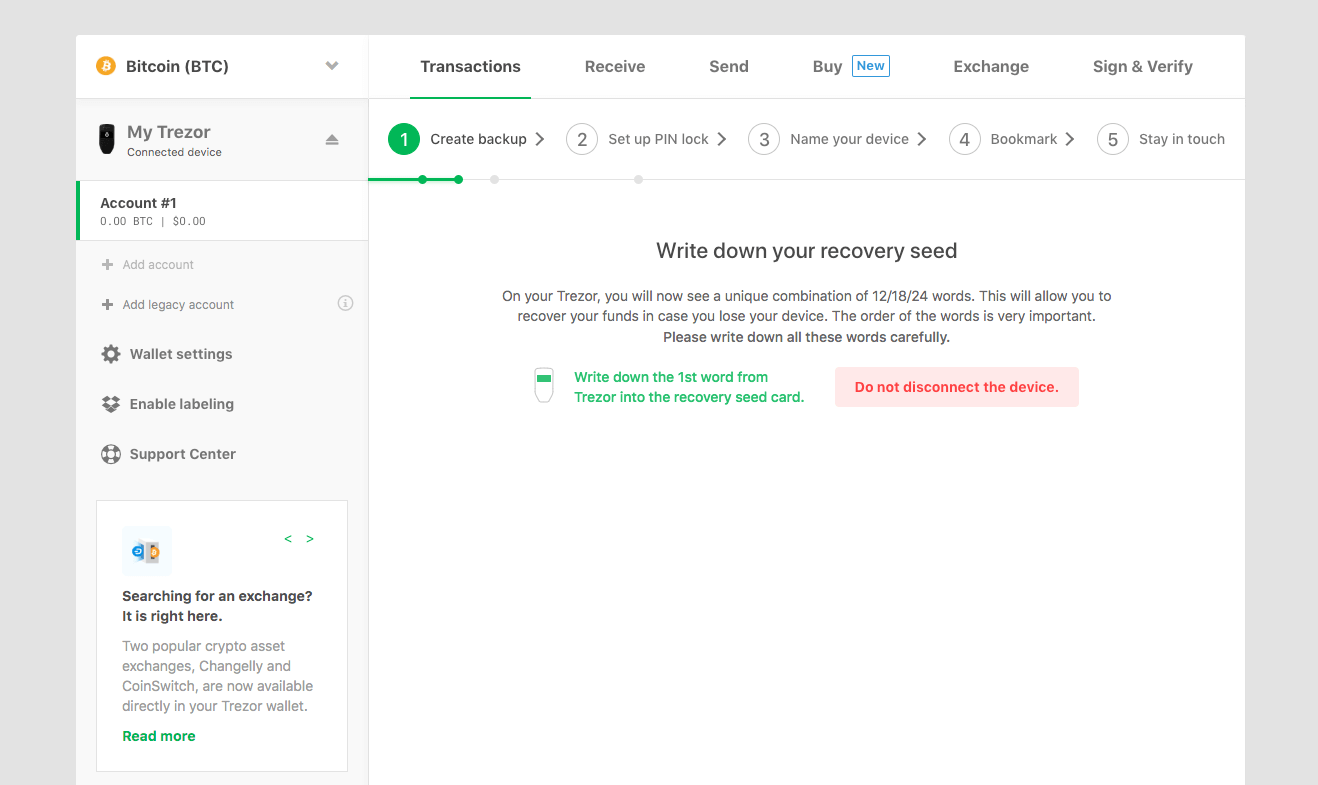
During this process the wallet interface itself will not actually display the recovery seed, it will only be displayed on your Trezor. Again, this comes back to the core principle of the device that the private keys never leave your unique piece of hardware.
Be sure to write down this private seed phrase by either using the booklets provided in the box or your own piece of paper. You must keep this phrase safe. If something happens to your Trezor, it will be the only way to access your funds again.
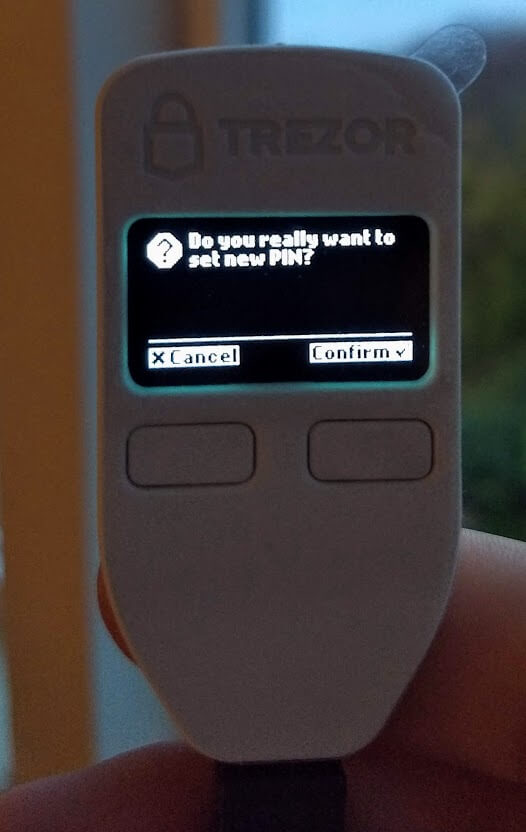
After backing up your Trezor via seed phrase, you will move to creating a unique PIN. This will ensure that, even if someone gains access to your device, they will not be able to use it to send a transaction from your cold storage.
Again, you will be called on to confirm the changes via a physical button press on the Trezor itself.
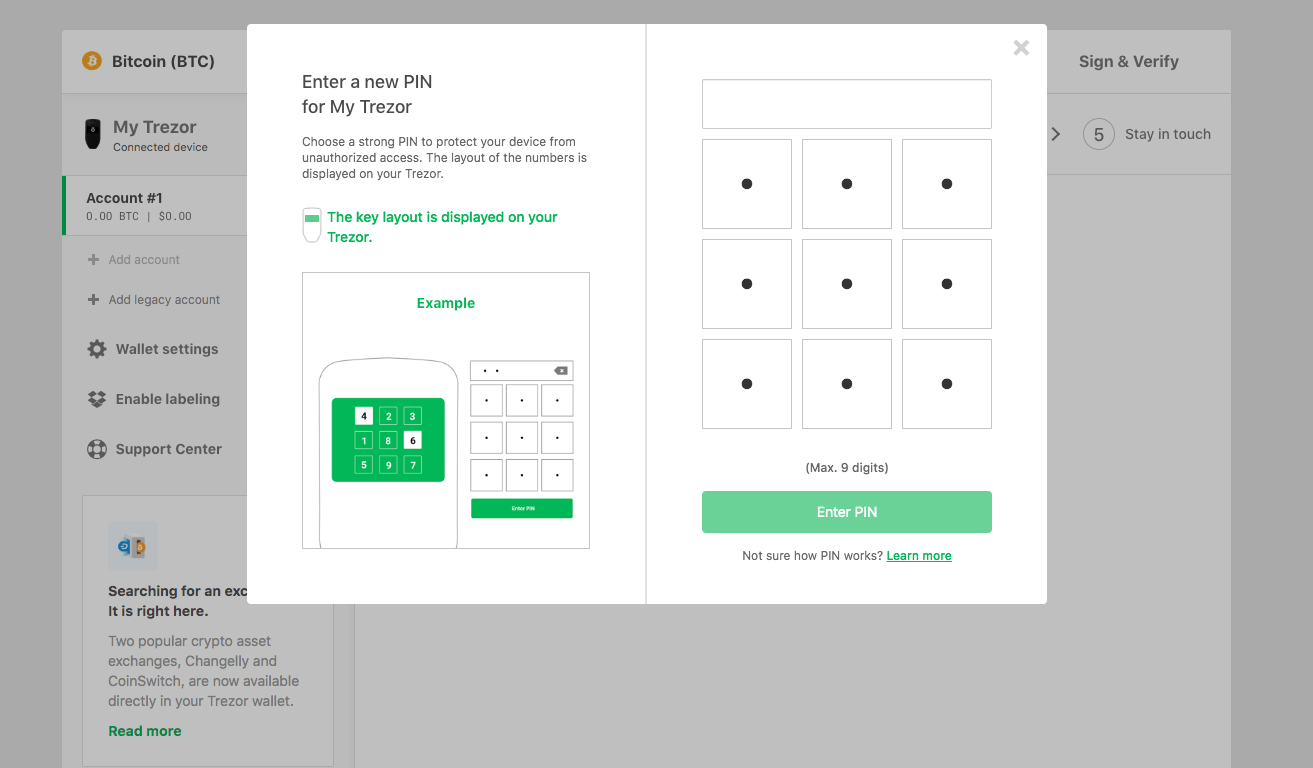
The pin will the be selected via a blind matrix. Randomized numbers will be displayed on the device itself and a corresponding selection pad displayed in the wallet interface will allow you to enter a pin of your choosing.
You can check out the video below for a quick look at how the process works in motion:
One thing to keep in mind when choosing your pin is that this won’t be a one-off thing. Pretty much every significant action you will want to take with your Trezor from here on out will require a pin. Obviously that doesn’t mean you should choose an easy pin and compromise security, but you should still be warned that this is a process that entering your unique pin via the wallet will be a common action. With this in mind, be sure that you record your pin securely but also have it somewhere that can be quickly accessed.
Once the backup phrase and PIN are set-up, you can name your device. The wallet makes this process extremely simple and once again you’ll be asked to confirm on your Trezor.
Receiving Transactions on a Trezor One
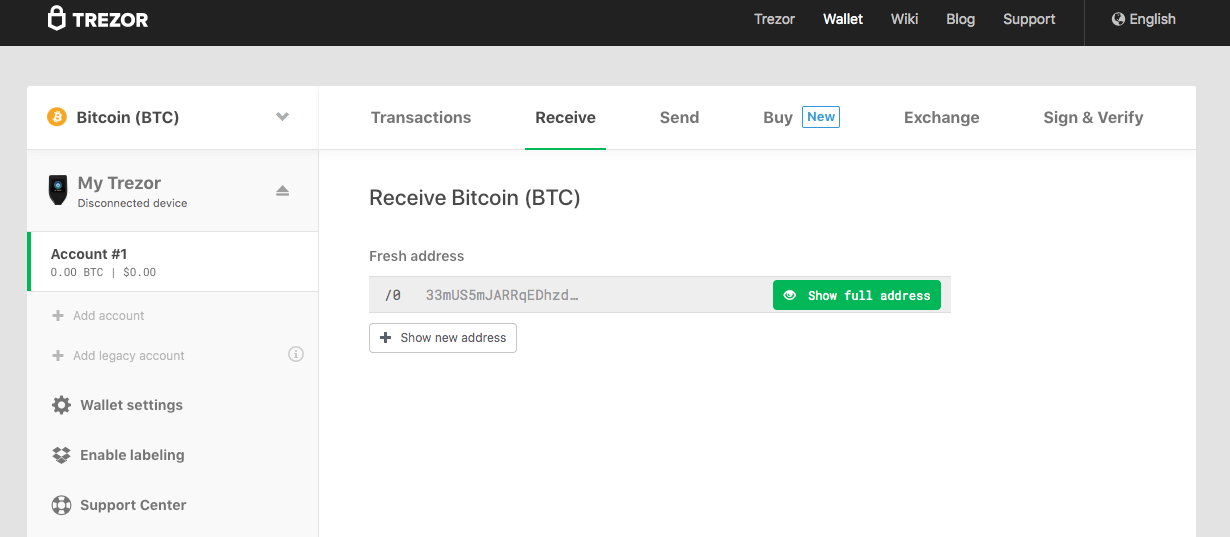
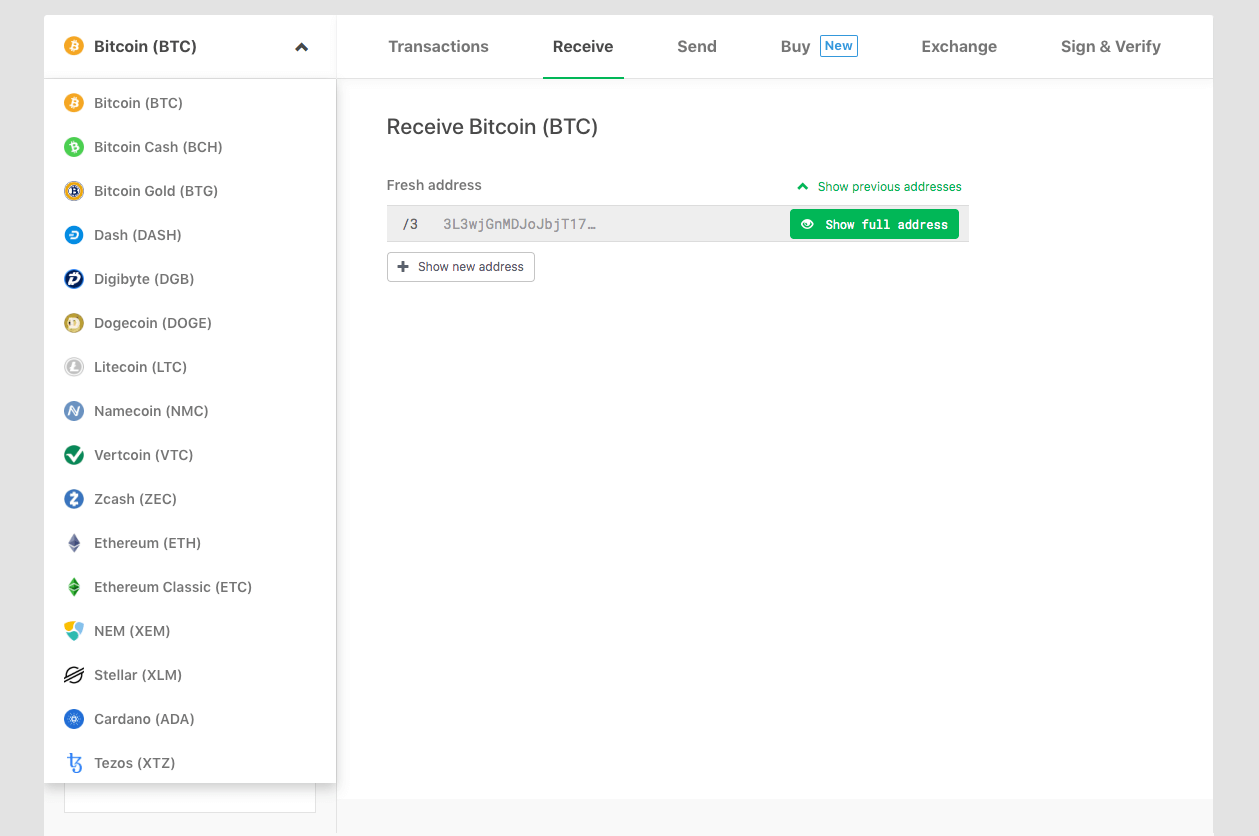
After the naming is complete, you’re ready to receive crypto to your wallet! To do so, simply navigate to the “Receive” tab of the wallet:
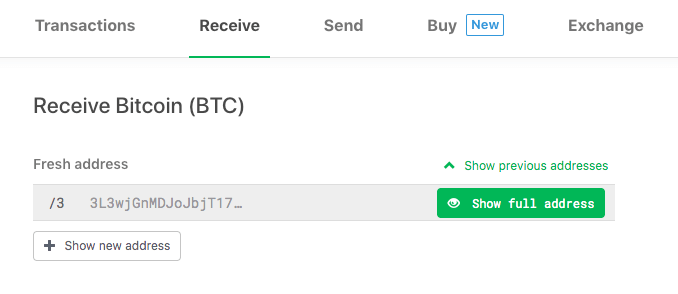
Clicking the “Show full address” button will then display the address for you to confirm on your Trezor:

This display on the device is, again, essential to security. In practice an infected computer could display an incorrect deposit address via the Trezor wallet, but that same virus could never change the address displayed on the Trezor itself. By confirming the receiving address on the screen, you are ensuring that your funds will be sent to an address that only you control.
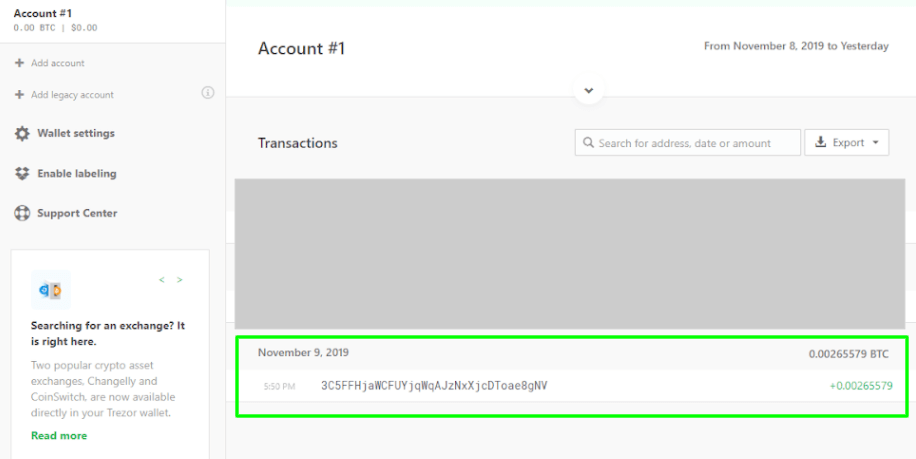
Once you have confirmed that the address does indeed match, you can safely send a deposit and expect it to show up within the wallet interface as soon as the transaction is confirmed by whatever blockchain network you are using. Here’s a view of how the completed transaction will appear:
While within this walkthrough we are using Bitcoin, the Trezor wallet interface allows you to quickly switch to a wide array of built in altcoin wallets:
Sending Transactions on a Trezor One
Once your wallet is funded (be that with bitcoins or altcoins), you’re ready to send a transaction. To do so you will use the Send tab in the interface:
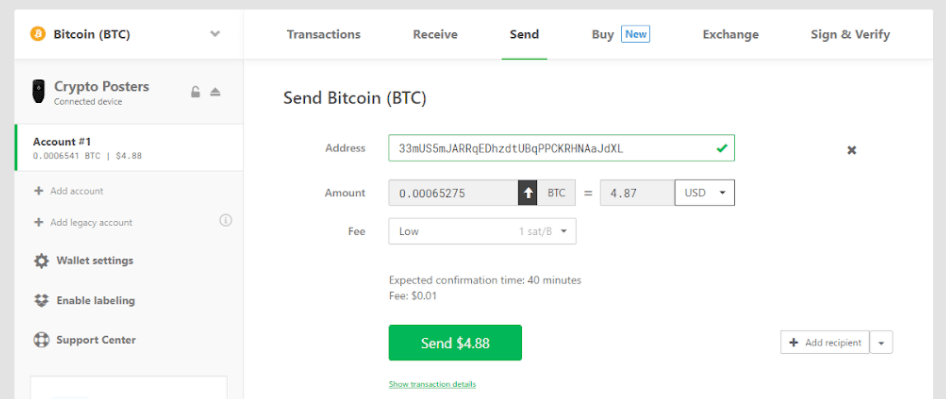
The interface is very user friendly. Enter the bitcoin address you want to send to, the amount you want to send, then select the fee. Note on the sending fee, this is variable and can be made as expensive or as cheap as you want:
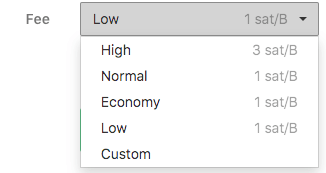
Generally you are safe to go with the preselected options, but there is a custom option as well. If you use this, be sure to note how changing the fee selector adjusts the actual cost of the fee estimate displayed above the green confirmation button. It is possible to adjust your custom fee incorrectly and spend all of your transaction on fees, so use this feature with care. In general, a high fee will allow your transaction to confirm faster on the blockchain. You can read more about transaction fees via the Trezor Wiki.
After you have all your transaction information set, you can hit the green confirmation button. This will trigger a request to enter your Trezor One pin:

After a pin entry, you will also need to physically confirm the transaction via a button press on the device:
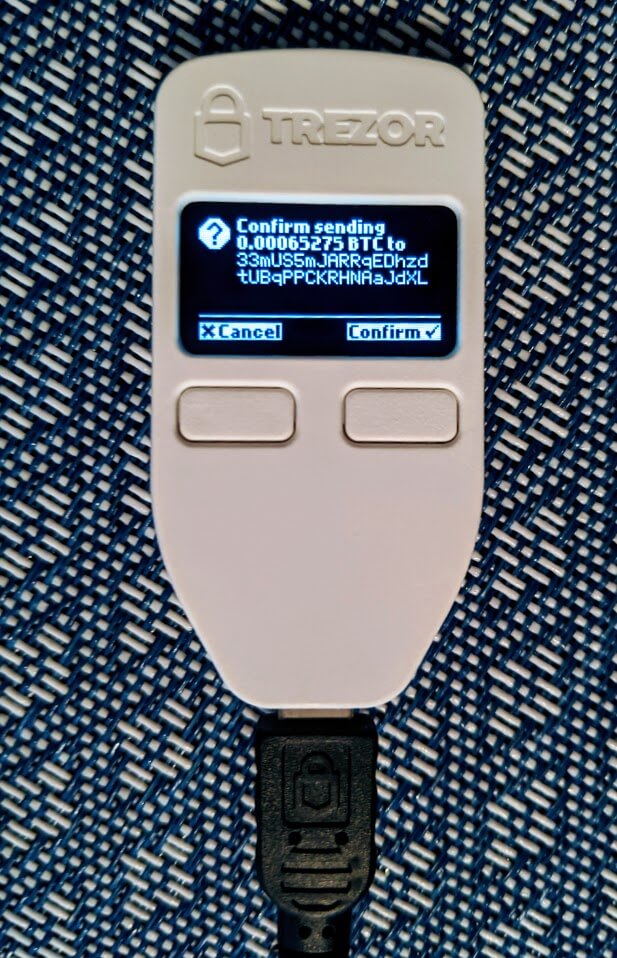
Finally, once confirmed on the device, the transaction will appear within your wallet interface under the transactions tab as a success:

Trezor One in Review
There are a wide array of functionalities beyond sending and receiving that can be done with a Trezor One including things like staking coins or using ERC20 tokens, but for now you should have all the basics needed to get started on your hardware wallet journey.
If you’re interested in purchasing a Trezor One, click the link below or move on to our next section walking you through the Trezor Model T.
How to Use a Trezor Model T
Setting up and using a Trezor Model T is very similar to the process we covered for the Trezor One. We’ll walk you through it below
Unboxing a Model T
The Trezor comes in the two-piece box seen below (plastic wrap that sealed box has been removed for photo quality):
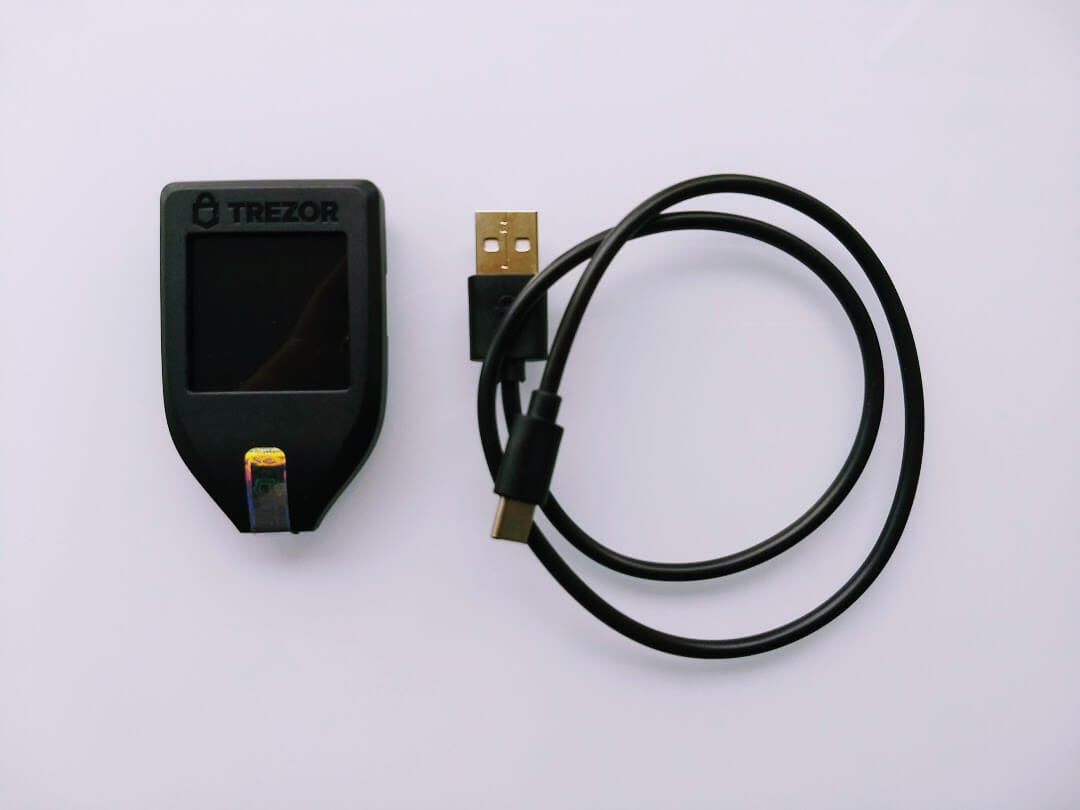
Once unboxed, you should have all the pieces below:

The package will contain:
- 1x Trezor Model T Device
- 1x USB-A to USB-C cable
- 2x Recovery seed card
- 4x Stickers
- 1x User manual
Focus on the Model T device:
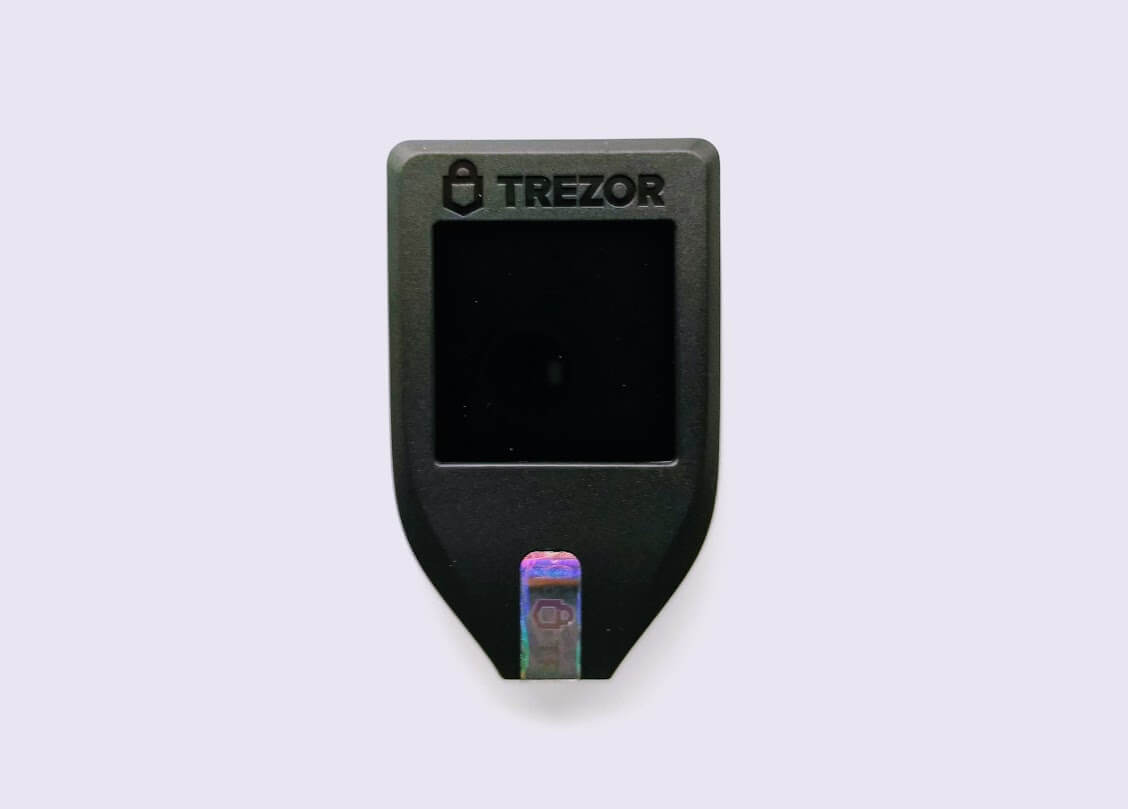
Note: As you may notice from the picture above, the two big differences between the Trezor One and the Trezor Model T are that:
- The Trezor Model T has no buttons
- The Trezor Model T has a holographic sticker at the bottom of the device
The lack of buttons is because the Model T utilizes a touchscreen. Meanwhile, the sticker at the bottom of the device covers up the USB port and is used to indicate any potential tampering with the device. This video shows how to remove the holographic sticker and its residue.
Setting Up a Trezor Model T
To begin the process you can follow the instructions on the box and navigate to Trezor.io/Start/. You’ll then be instructed to select the device you are using (in this case, a Trezor Model T), and confirm. From there, you’ll be taken to the wallet homepage and asked to connect your device:
Connecting the device is as simple as using the provided micro USB cable to plug the Trezor into your computer. You may receive a pop-up message that identifies the device.
Note: If you’re having trouble connecting the device, you will likely want to install the Trezor bridge communication software. It’s not always required, but if for some reason your browser is not recognizing the device, it should ensure that the process works flawlessly.
The Model T itself will also tell you where to go to start using the device (if you happen to have misplaced the box):
Once your Trezor Model T is connected, you will see a screen prompting you to update the firmware. This is always recommended as the latest firmware will ensure that your device is as secure as possible.

Note that the screen of the Model T will be displaying updates as you make your way through the setup process. For example you’ll see the confirmation message and update statuses shown below when updating the firmware:
Following the firmware update you’ll be taken through a process that includes creating your backup (the recovery seed we mentioned earlier), setting up a PIN lock for the device, and naming the device. The first step is the backup process:
After confirming you’ll be prompted to finish the process on the Model T device:
During this process the wallet interface itself will not actually display the recovery seed, it will only be displayed on your Trezor. Again, this comes back to the core principle of the device that the private keys never leave your unique piece of hardware.
You will first see a confirmation message on the device:
Next your Trezor Model T will display your private seed. Be sure to write down this private seed phrase by either using the booklets provided in the box or your own piece of paper. You must keep this phrase safe. If something happens to your Trezor, it will be the only way to access your funds again.
After backing up your Trezor via seed phrase, you will be asked to type in specific seed words to the device via the touchscreen. This confirms that you have properly stores your phrase and still have access to it:

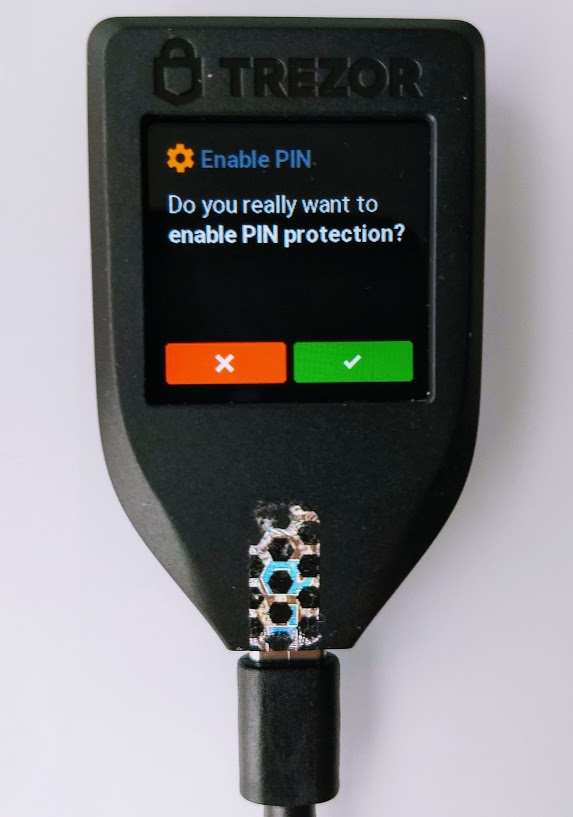
Next you will move to creating a unique PIN. This will ensure that, even if someone gains access to your device, they will not be able to use it to send a transaction from your cold storage.
Again, you will be called on to confirm the changes via a prompt on the Model T itself.
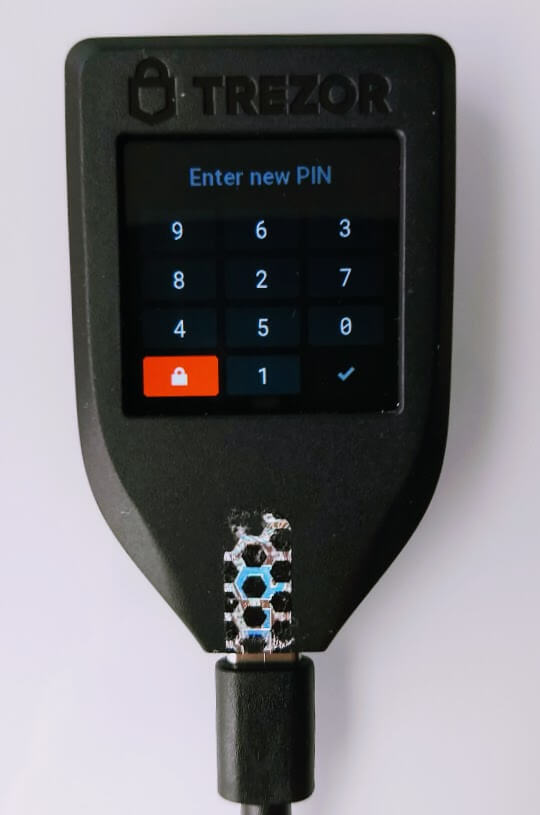
The pin will the be selected via a randomized keypad on the device itself. Similar to the seed phrase, ensure that you store this pin in a safe place that only you can access. Losing the pin will effectively cause you to lose access to the funds on the Model T:
Once the backup phrase and PIN are set-up, you can name your device. The wallet makes this process extremely simple and once again you’ll be asked to confirm on your Model T. After naming, you’re ready to start making transactions.
Receiving Transactions on a Trezor Model T
The first step will be to navigate to the “Receive” tab of the wallet:
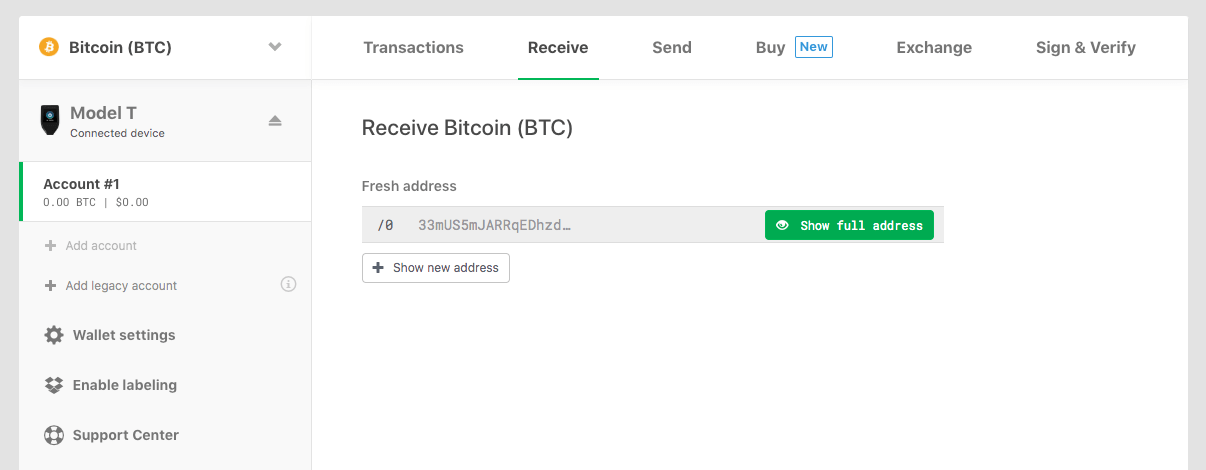
Clicking the “Show full address” button will then display the address for you to confirm on your Trezor:
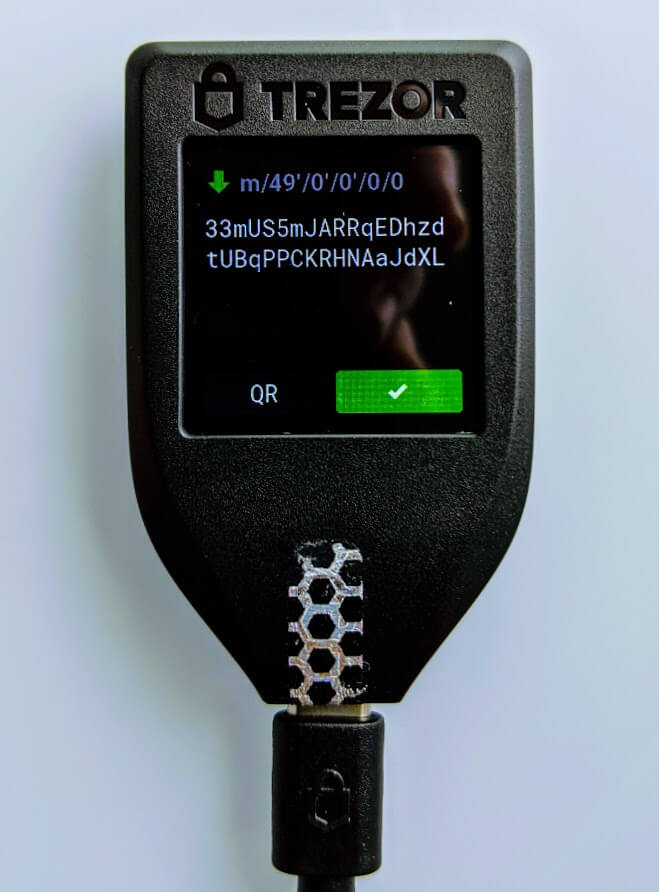
The display of this address on the device is essential to security. In practice an infected computer could display an incorrect deposit address via the Trezor wallet, but that same virus could never change the address displayed on the Model T screen itself. By confirming the receiving address on the screen, you are ensuring that your funds will be sent to an address that only you control.
Once you have confirmed that the address matches, you can safely send a deposit and expect it to show up within the wallet interface as soon as the transaction is confirmed by whatever blockchain network you are using. Here is a picture of what the confirmation message will look like under the Transactions tab:
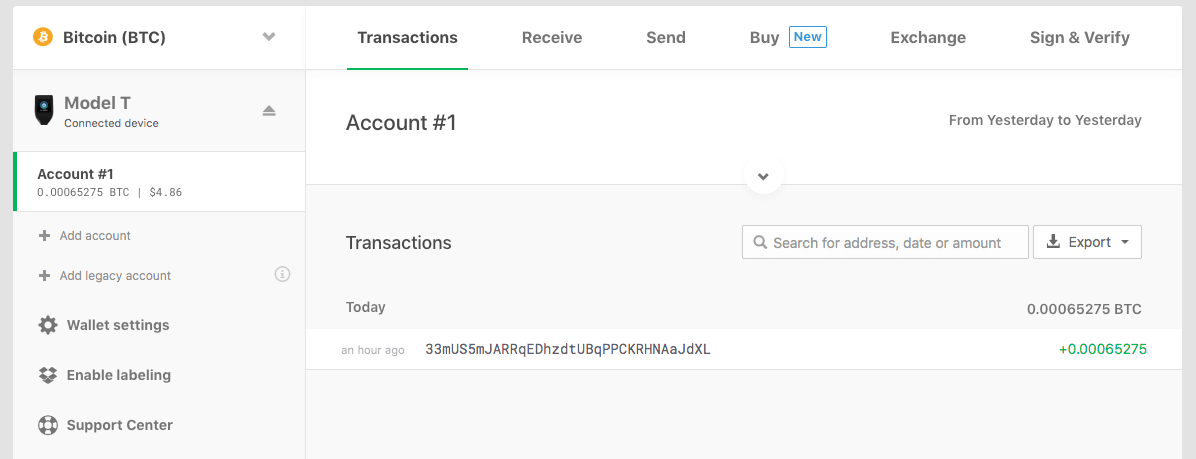
While within this walkthrough we are using Bitcoin, keep in mind that the Trezor wallet interface allows you to quickly switch to a wide array of built in altcoin wallets:
Once your Model T wallet is funded, you’re ready to send a transaction!
Sending Transactions on a Trezor Model T
To start you will use the Send tab in the interface:
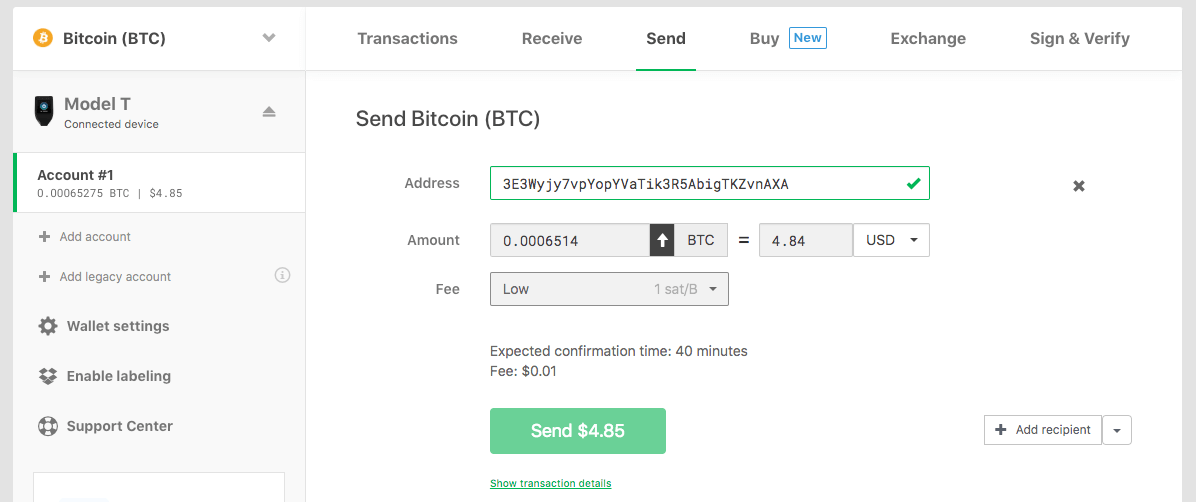
The interface is very user friendly. Enter the bitcoin address you want to send to, the amount you want to send, then select the fee. Note on the sending fee, this is variable and can be made as expensive or as cheap as you want:
Generally you are safe to go with the preselected options, but there is a custom option as well. If you use this, be sure to note how changing the fee selector adjusts the actual cost of the fee estimate displayed above the green confirmation button. It is possible to adjust your custom fee incorrectly and spend all of your transaction on fees, so use this feature with care. In general, a high fee will allow your transaction to confirm faster on the blockchain. You can read more about transaction fees via the Trezor Wiki.
After you have all your transaction information set, you can hit the green confirmation button. This will trigger you to complete the confirmation via the Model T’s screen:
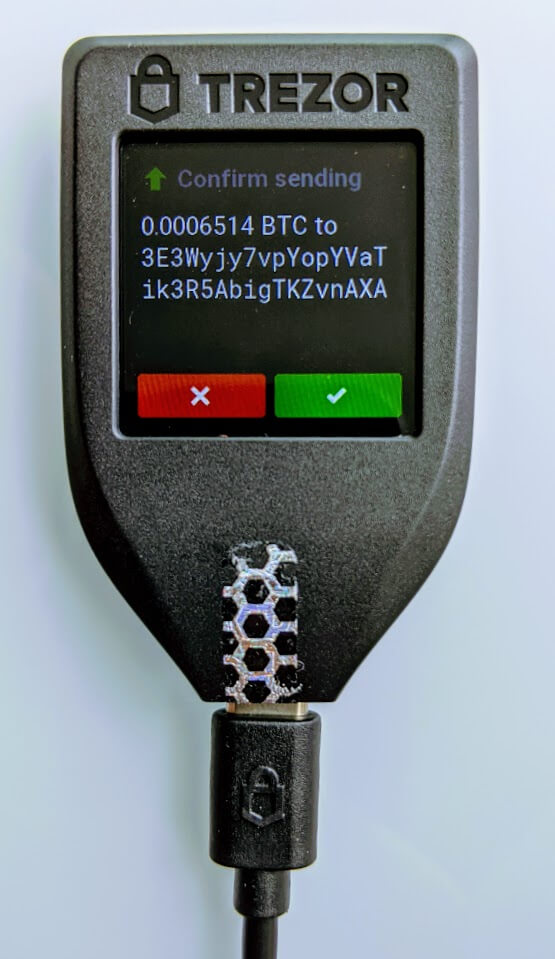
One more confirmation screen:
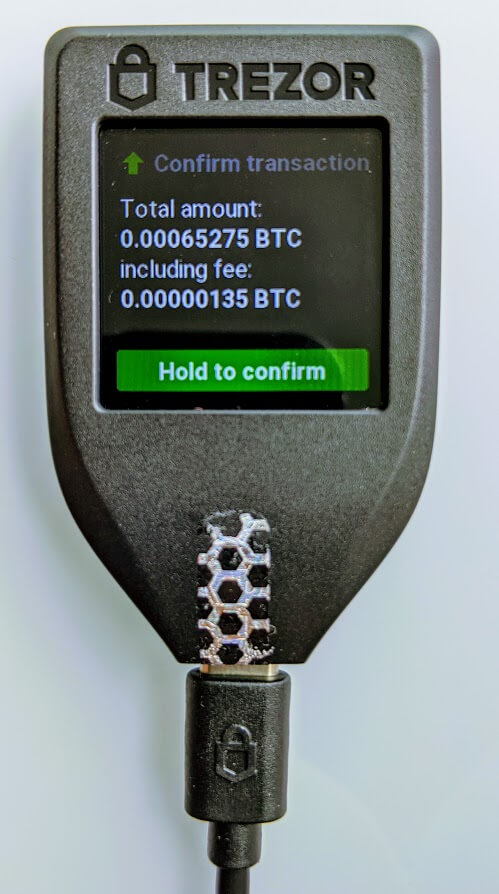
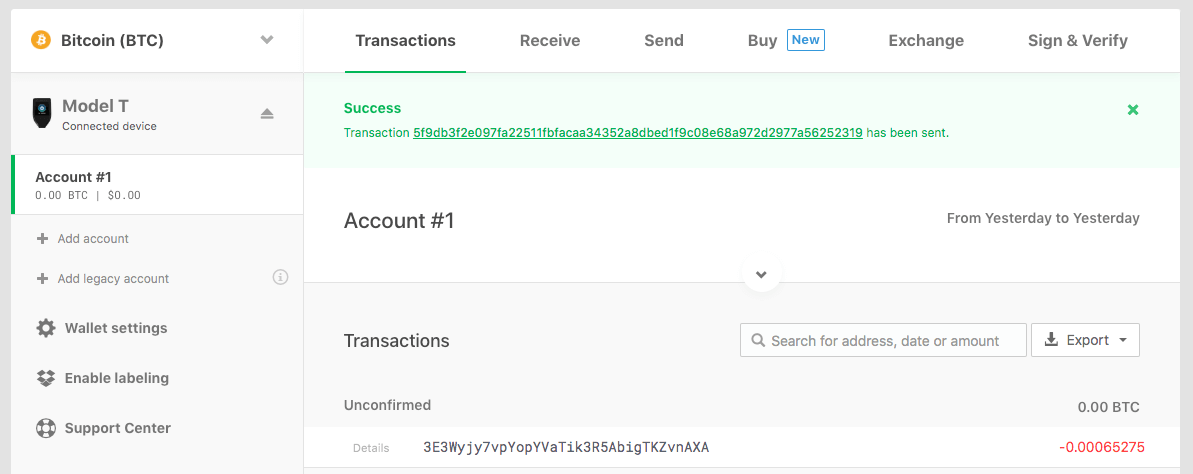
Finally, once confirmed on the device, the transaction will appear within your wallet interface under the transactions tab as a success:
Trezor Model T in Review
And there you go! Everything you need to know about how the Model T works when it comes to key storage and sending / receiving transactions. Think I missed something? Feel free to send your thought to [email protected] or to reach out on Twitter via @postersofcrypto. Any feedback will be used to make this article the best resource it can possibly be.
If you’re interested in purchasing a Trezor Model T, you can click the link below.